Self Publishing 1 [Click the link to download the sample document. There might be some minor differences.]
*This post was created on a PC using Firefox as of right now I do know there is a problem with the images on Safari which may or may not be worked out.
Paragraphs
Page Break (Insert tab)
Justification
Page Break / Section Break (Page Layout tab)
Title page & Copyright Page
Book Size & Margins
Header & Footer
I won’t be trying to turn you into a professional with this series but I will be able to give you a guide so that you can begin to help yourself. Self publishing, whether it be in print or electronic may seem like a daunting task but in fact it’s quite straight forward. Of course I’m expecting you to be able to produce your own quality content. The question or possible problem I’m going to try and help you solve is what to do with it once you’ve gotten your words down on metaphorical paper. This is a word 2007 tutorial but for other systems and platforms simply search the terminology and the alternatives shouldn’t be too hard to find.
Paragraphs
The first thing you need to do is create your document. A tip that will speed things up for you is that while in the process of creating keep the formatting to a minimum. Also, make a note from here that this document is for print not for electronic publishing. I will touch on e-publishing later on in the series but in a way where formatting for the purpose of conversion isn’t necessary. One thing you need to do before you start though is set your paragraph structure.
You can use “block” paragraphs or you can use “first line indent” paragraphs. In the related video you’ll see a demonstration of the former. Common mistakes most people make in both instances is either pressing the return key more than is necessary or using tab indent to indicate a paragraph. If you do this you run the risk of losing uniformity in your document. What you need to do to avoid this is the following:
Figure 1:

1) expand the Paragraph group in your Home tab (Figure 1)
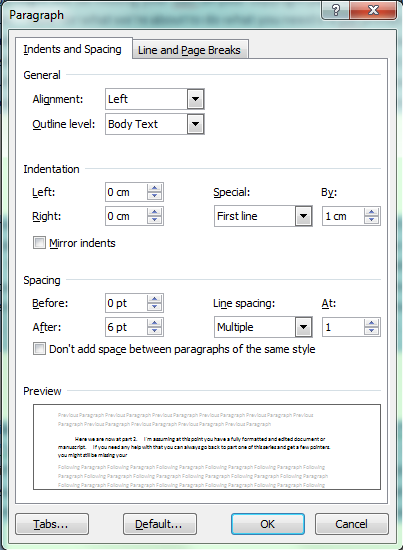
a) this will bring up your Indent and Spacing options (Figure 1a)
Figure 1a:

First line indent
2) search for the section that says Indentation and in the drop down menu that is labeled Special select the First line option
3) once you do that there is a unit amount indicated with a By label that you can adjust according to the indentation that best suits your needs
4) set an amount that you like and once you do press the OK button and your first line indent is set
What this will do for you is make sure every time you press the “Enter” or “Return” key on your keyboard the first line will indent by the amount you selected without pressing the “Tab” key.
Block paragraphs
2) search for the Spacing section and find the After option
3) set it to 6pt. (Figure 1a) and press the OK button
Setting the spacing to 6pt. is a good spacing option but as with the first line indent you can set it to suit your needs. What this does is allow you to only press the return key once to generate the right space between your paragraphs.
Note: If later in your document your characters have dialogue or something similar the spacing and indent options won’t work visually. What I suggest is when you’re finished creating your document highlight and change the options for the specific sections.
Page Break (Insert tab)
Figure 2:

Once you’ve settled on a paragraph structure begin to create your document. If you’re writing a book with more than one chapter or sections what you need to do is create page breaks. Again, this helps you avoid an over reliance on the “Enter” key and makes sure that changing spacing or content before a break point won’t affect the page position of what comes after.
1) go to the Insert tab and you’ll find the Pages group (Figure 2)
2) you’ll see the Page Break option and which you will use every time you complete a chapter or section
While you’re creating your document those are two things you have to keep an eye on; paragraph structure and page breaks. While taking heed to them create your document and complete your editing process.
Justification
Once you’ve completed the document to your satisfaction the real formatting begins. The first thing I will have you do is justify align your content.
1) highlight your entire document and navigate back to your Home tab (Figure 1)
2) in your Paragraph group select the Justify align option (Ctrl+J)
This will effectively align both the left and right margins. No matter what it looks like, trust that what you have done is correct. If you find that your spacing is awkward wait until your page size and margins are set and then play around with your font face and font size to get it to your liking. If done properly there shouldn’t be a reason to do this but not all programs run the same.
Page Break / Section Break (Page Layout tab)
There are still three (maybe 5) essential pages missing. The title page, the copyright page and the table of contents are the obvious three. The other two potential pages are basically blank. At the end of your document you will need to have an evened numbered blank page and after your table of contents I suggest having a blank page as well. The even numbered blank page is essential for publication and availability in certain markets while the blank page after the table of contents is a layout suggestion I recommend strongly. For the purpose of this tutorial we’re going to start by inserting the necessary blank pages at the beginning of the document.
Figure 3:

1) navigate your cursor back to the very top of your document then go to the Page Layout tab and look for the Page Setup grouping (Figure 3).
a) in the group there is an option that is labeled Breaks.
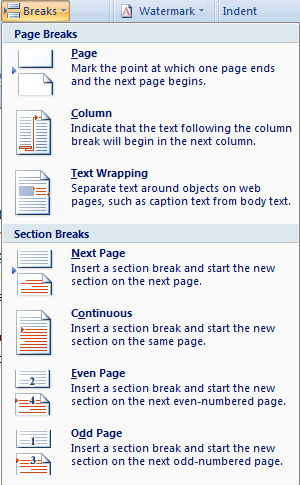
2) expanding the Break option will produce a drop down menu divided into two sections: Page Breaks and Section Breaks (Figure 3a).
Figure 3a:

Page Breaks
3) in the Page Breaks section select Page
4) repeat this process until you have all the blank pages you need
a) for our example there were four pages
Section Breaks
3) put your cursor at the end of the last inserted page
4) go back to the Breaks drop down menu, go to the Section Breaks area and select the Next Page option
What this does is give you the option to separate or join all header and footer formatting between the sections moving forward. Now we have a plain manuscript that’s waiting for you to turn it into a book. For now I suggest waiting until the book size and margins have been defined before inserting the blank page at the end of your document. The process will be the same.
Title Page & Copyright Page
The title page and the copyright pages need to contain certain information. To find out what they are your best bet is to look in an already published book that is in your genre and use the format. There is nothing wrong with using a standard that already works and it will also give your work some professional polish. I’m keeping the outline as simple as possible so I’ll only list the necessary information. All you need on the title page is the title of your book. The only qualification you need for your title is to make sure that it’s capitalised according to capitalisation rules regardless how it appears on your cover. For your copyright page list who it’s © copyrighted to (whether that be you or a publisher), the ISBN number (if you have one) and a short blurb on the consequences for breaching copyright. What you add after that is up to you.
Book Size & Margins
Your book still isn’t a book just yet. There is still the issue of sizing and margins. Try and select a size that’s an industry standard as this will allow your book to be distributed through a lot more channels. After doing a bit of research I settled on dimensions of 8″x5″ (HxW) The steps below shouldn’t be too hard to follow.
1) let’s go back to the Page Layout tab (Figure 3) and expand the Page Setup group
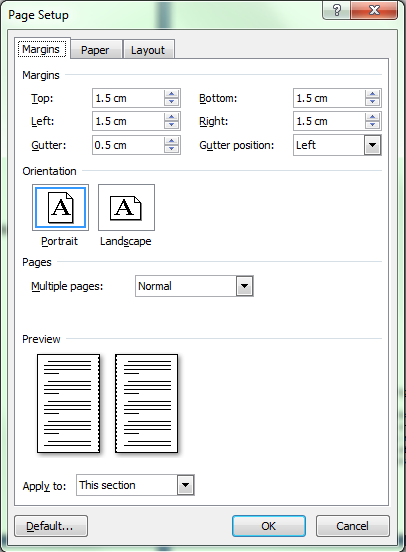
2) once the Page Setup window is opened we begin with the Margins tab (Figure 3b)
Figure 3b:

The margins are simple enough. All margins will be set to 1.5cm (approx. 0.60″). Make sure your Gutter position is set to the left and your Gutter margin is at most 0.5cm (approx. 0.20″). You need to set the Gutter so that when your book is bound the text on your inner margin isn’t difficult to read.
Once the margins are set move to the Paper tab (Figure 3c) where we’ll set the page size. Even if there is a default size that matches our chosen book size, use the custom size settings. Manually type in your size settings and move to the next tab.
Figure 3c:

Note: The diagrams are all in metric but you are able to set your dimensions to imperial measurements if that is more comfortable. Choose the book size that is appropriate for your manuscript because the size chosen here is for demonstration purposes only.
Figure 3d:

The last tab in the Page Setup window is the Layout tab (Figure 3d) and there are only two things you need to check here.
3) in the Section start drop down menu make sure it’s set to the default of New page
4) in the next section down – Headers and footers – highlight the Different odd and even option
This last option dictates to your document that all odd and even pages will be formatted separately from each other. This setting will make adding page numbers more functional and versatile. Later when you are adding page numbers highlighting the Different first page option can help so keep that in mind.
5) ensure that your Apply to option is set to the Whole document and press OK
The good news is we’re almost finished and hopefully the process so far has been straight forward. Before we’re done though there’s one last thing to outline.
Header & Footer
The only thing missing now is a running header and page numbers. With the steps taken above your document should be separated into sections. Whichever section your main content starts on, bring up your header and footer on that page. You can achieve this quickly by double clicking on the empty space at the top of the page. You will notice a new tab labeled Design on your Ribbon (Figure 4). In the Navigation group on this tab there is an option that is labelled Link to Previous. Make sure it’s not highlighted as shown in the image. Now that that’s done apply the same steps to your footer. You’ve now made sure there will be no header or footer on your title page, copyright page and table of contents. After you’ve “unlinked” the sections you can now start entering the running header and footer.
Figure 4:

Note: To enter the page numbers there is an option in the Header and Footer group. For simplicity your header should be your book title centered (properly capitalised) and your footer should be your page numbers. Due to the fact that your odd and even pages have been separated, you will have to repeat the process to ensure that both even and odd pages are formatted within the section. When you do insert your page numbers be sure that your even numbers appear on the left side of the page and your odd numbers appear on the right.
Figure 4a:

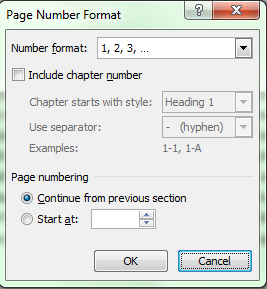
Before I close this off take a look at the Page Number Format window (Figure 4a). You can get to this through the Header and Footer group located either on the Design tab or the Insert tab. In the Header and Footer group there is a Page Number option that leads to a menu that has Format Page Numbers in the list. Select that option and once the window pops up you’ll see a few defaults you can play around with. Page numbering is the option that you should take notice of. As of now Word is still counting your title page as page 1 (although an actual number will not show up on the page and the first number you will see if you followed all the steps is page 5). Changing the default will allow you to change where the document starts counting page 1. If it doesn’t make sense fool around with it and see what happens. There is always undo if you end up with something you don’t want.
These are basics. This isn’t going to create a mind blowing manuscript with eccentric styling. Style is subject to taste (and it would make this tutorial a lot longer than it already is). The real keys are consistency and uniformity. What you have is a clean base to build on hassle free. Hopefully the walk through was informative and helpful. If you catch any errors feel free to comment or contact me directly through the contact form and I’ll be more than happy to address it.